NetGuard is a free Android app that stops selected apps (user or system apps) from having internet access on your Android phone. It restricts the apps you specify, from using WiFi, Mobile data or both.
You don’t need a rooted phone to use NetGuard.
The app gives you two icons for each app you have on your phone. A WiFi icon and a Mobile Data icon, tapping on either of them will either allow or restrict access to the app it is on.


In this detailed tutorial, you’re going to learn all you need to know about how to use NetGuard for blocking internet access on your Android phone, step by step.
Step 1: Download NetGuard and Carry Out Initial Setup
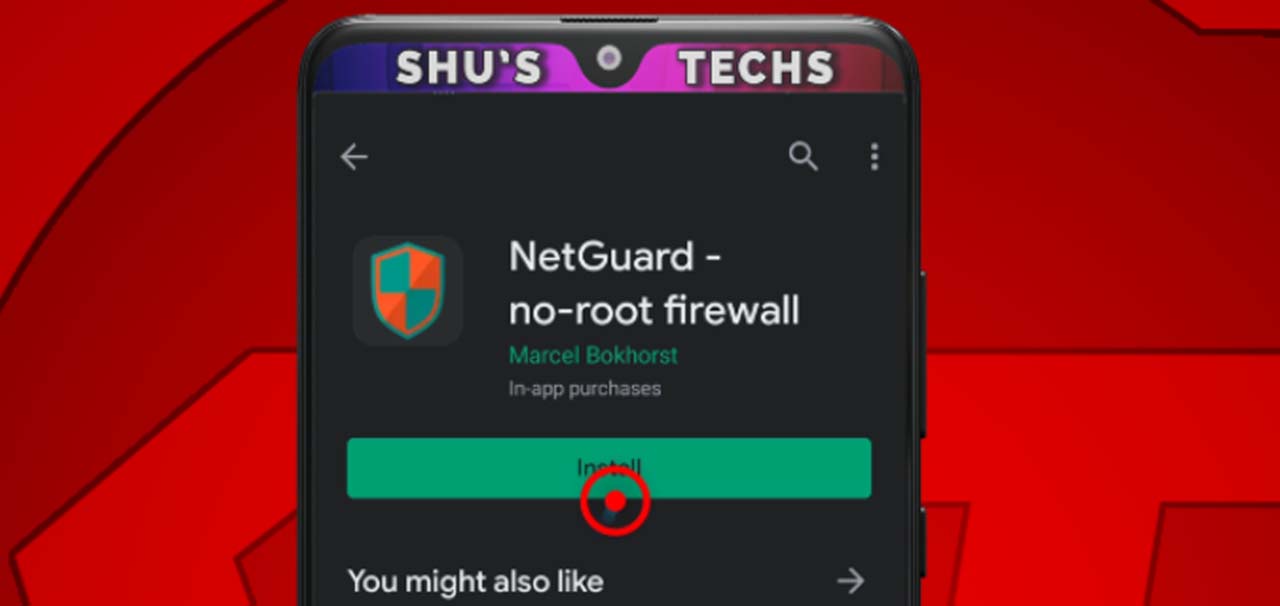
Download NetGuard on your Android phone by clicking here. The link will take you to the Google Play Store.
When you get there, tap the install button as shown below.
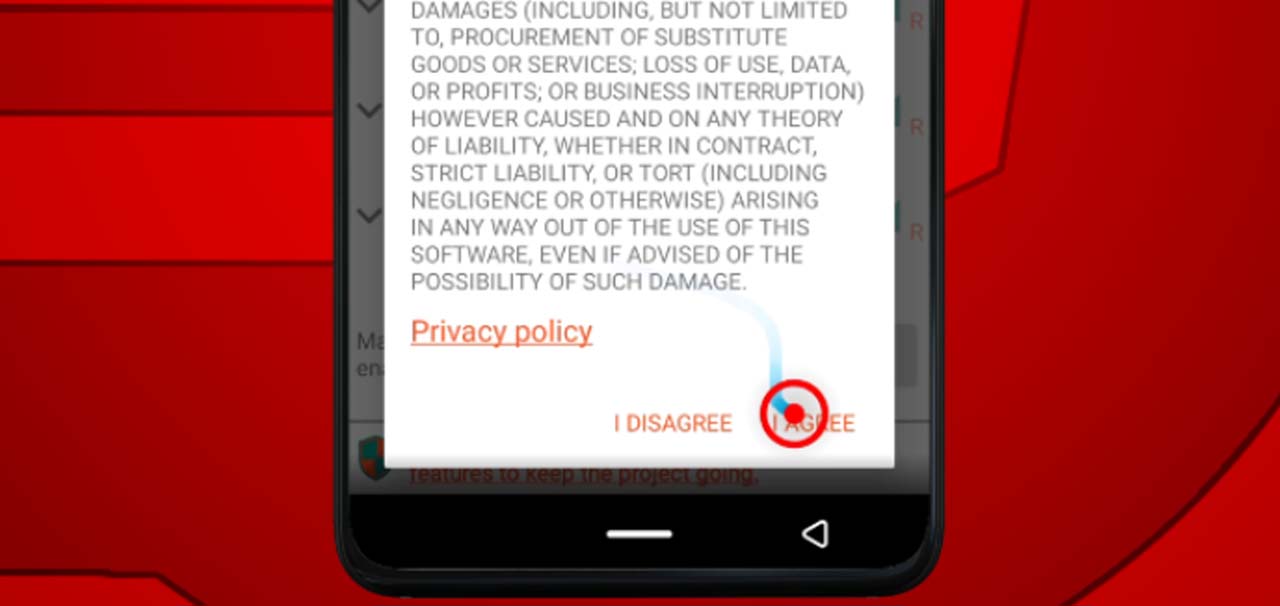
Wait for a while for NetGuard to finish downloading then tap open, read the Privacy Policy if you want to, then tap I Agree.
Now read all the texts with OK buttons by their side, when you’re done, tap all the OK buttons.


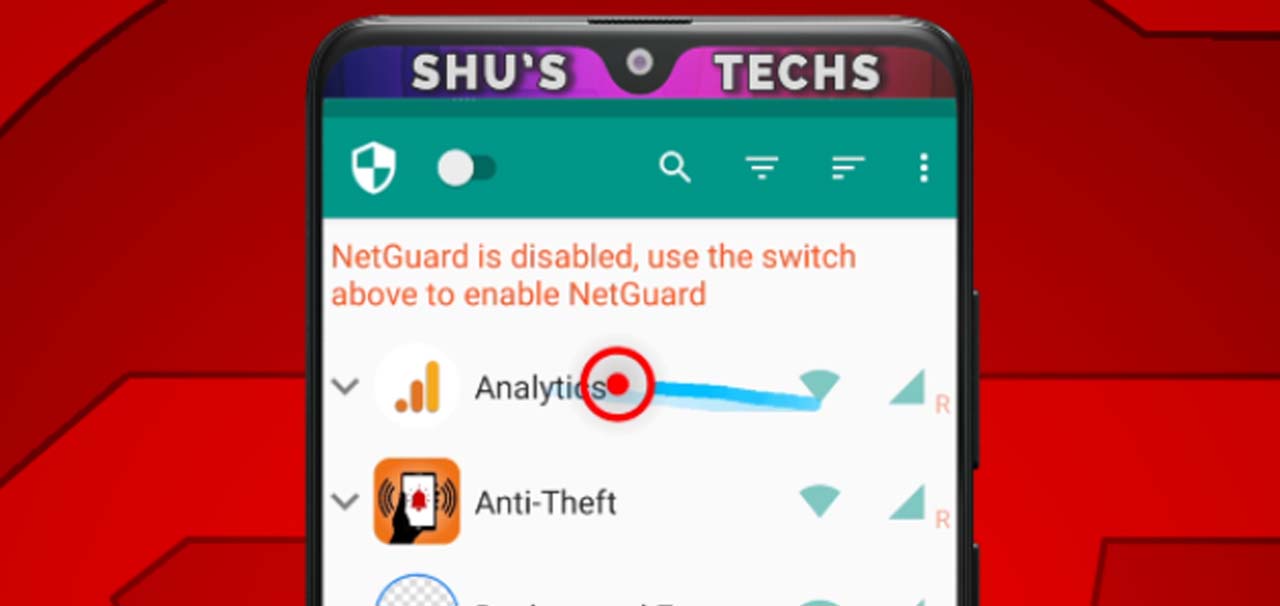
You’re going to be left with a list of some of the apps you have installed on your phone. In the example below, you can see two apps.
The first one is the Analytics app while the second one is the Anti-Theft app. Notice the WiFi and Mobile Data symbols as well.
Step 2: Do all Major Settings
Before you start stopping apps from having internet access, it’s ideal to make sure you complete all the necessary settings.
This section may be the longest part of this tutorial, but the good thing is that, you won’t have to do it more than once.
You only have to do this the first time you start using NetGuard, or each time you install the app.
If you don’t want to have to do all the settings yourself, click here to get my NetGuard exported settings. You will be able to import it to your phone after downloading it. It will save you a lot of time.
Below are all the major settings to be done.
Block all Apps from Having Internet Access
Blocking all apps from having internet access is a good way to start because after blocking them by default, you only get to choose the ones you want to have internet access.
It saves a lot of time because you’re going to have more blocked apps compared to unblocked ones in the end.
So just block all apps before you select the few you want to keep using internet with.
Follow the steps below.
Step 1: Tap the options icon.
Step 2: Tap Settings.

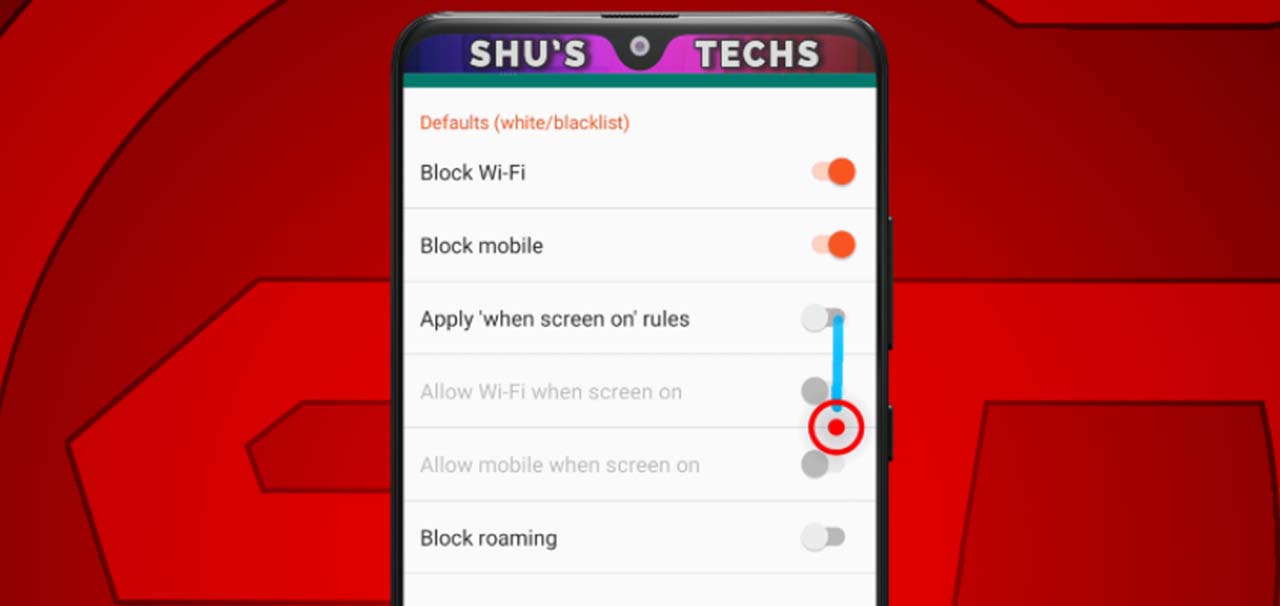
Step 3: Tap Defaults (white/blacklist).

Step 4: Now you’re going to see a few options, just enable Block WiFi, Block Mobile and disable Apply when screen on rules.
Now tap your back button to head back to the Settings Page for the next step.
Change Theme (Optional)
You don’t really need to carry out this step, but I’m putting it here because I did it in the video tutorial I made and I don’t want you to get confused when you see the new color of NetGuard.
So if you want to, change the theme, else just leave it the way it is.
Step 1: Tap Options.
Step 2: Enable Use Dark Theme

Then give the app a few seconds to go dark.
Manage System Apps
By default, NetGuard doesn’t give you the option to manage the system apps (apps that come preinstalled on your phone).
Also blocking those apps is ideal if you want full control of what apps are using your internet connection.
So here is a simple way to manage those apps too.
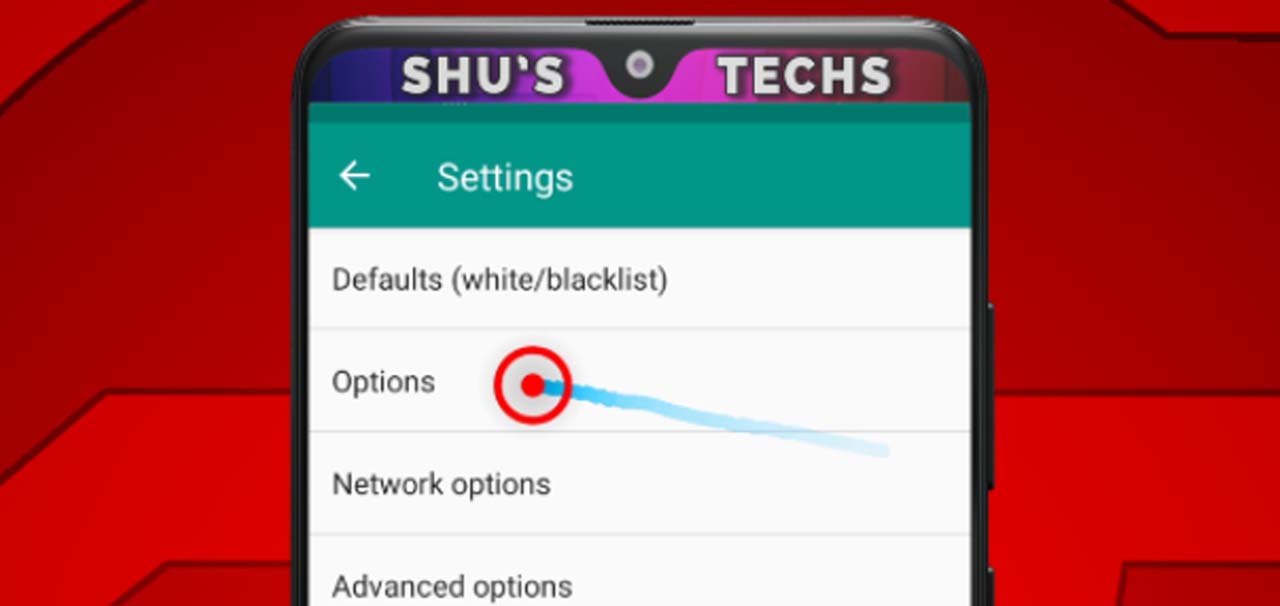
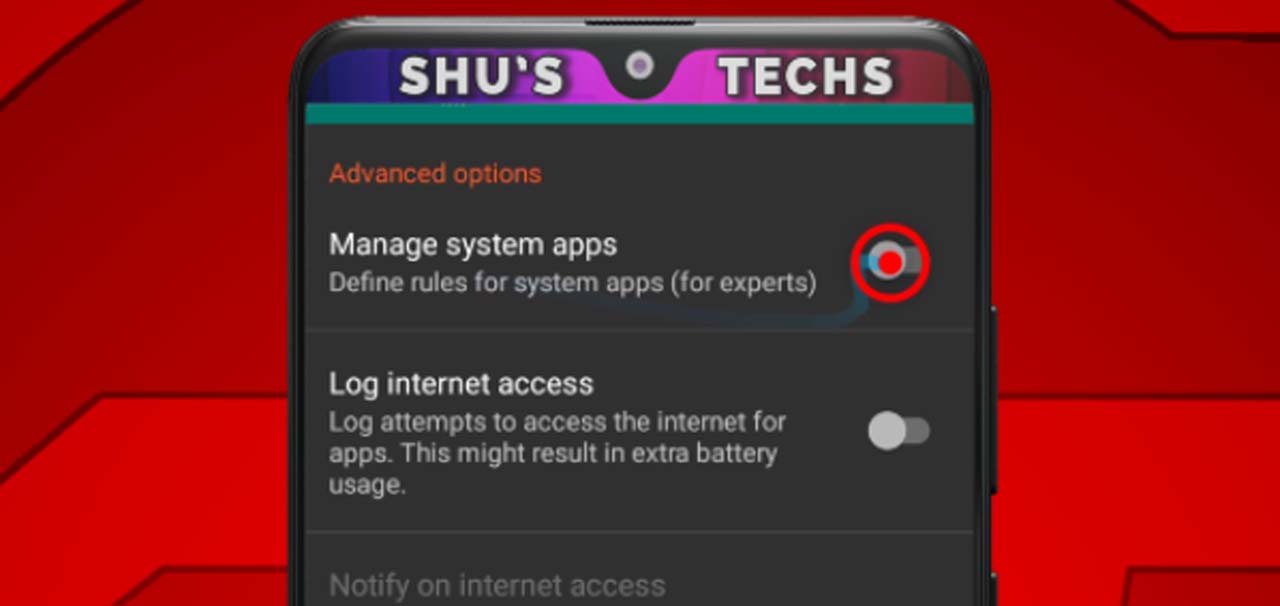
Step 1: While on the Settings screen, tap Advanced Options.

Step 2: Now tap the switch next to Manage System apps to activate it.

Tap the back button until you’re on the main interface where all the apps on the phone are listed.
You should notice more apps added to the list.
All the apps with a red label are the System Apps (apps that come preinstalled on your phone) while the apps labeled with white texts are apps you downloaded yourself.


Step 3: Allow or Block Apps
If you carried out step 2 successfully, all the apps you have will be restricted from having internet access. Except three Google system apps, and that’s fine.
You can tell that an app is blocked if the WiFi or Mobile Data symbol beside it is red.
If the symbols are green, that means the app has internet access.
So go through the list of all your apps and allow either mobile or WiFi or both since they are all blocked, by tapping each symbol.
When you’re done, head back to the top of the list and swipe down to force a refresh.


Step 4: Enable NetGuard (Start Blocking)
After selecting all the apps you want having internet access, tap the switch on the top left to start blocking all the other apps on your phone from having internet access.

You’re going to get a few options, but like I said earlier you’re only doing this the first time you install the app.
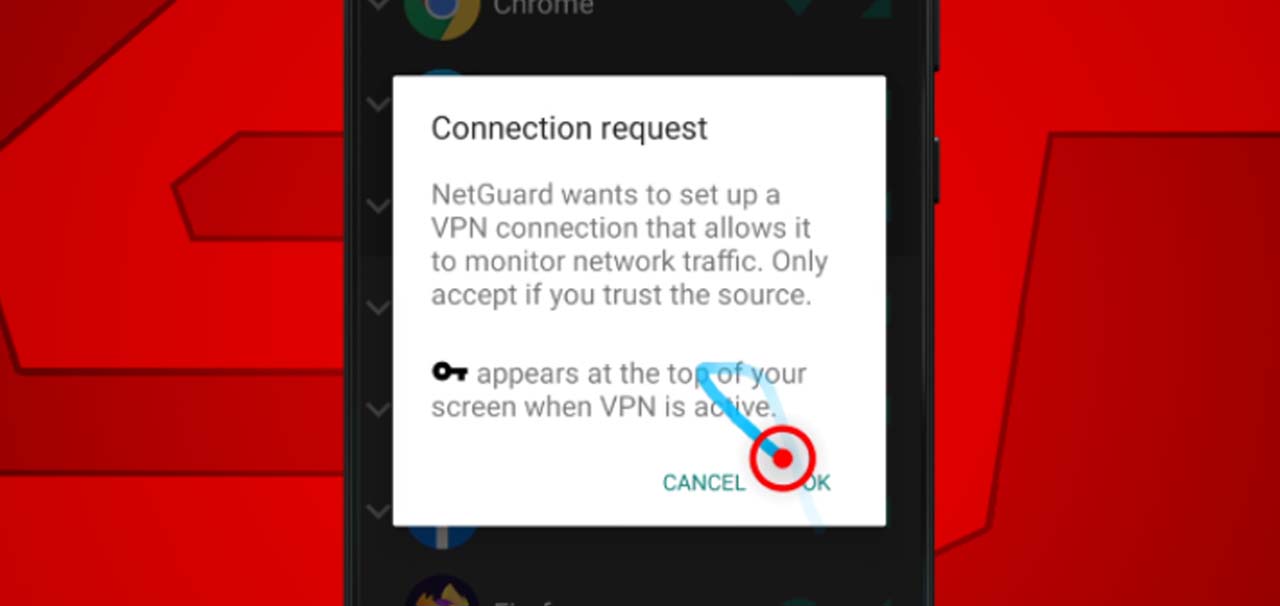
So the first is going to be a message, telling you that NetGuard is going to create a local VPN on your phone, just tap OK.

Next, the VPN is going to get created, so tap OK again.
The final option is the Battery Optimization option. Since NetGuard needs to be constantly active, you will have to stop your phone from shutting it down because it wants to save battery.
NetGuard has been made to be battery efficient, so don’t worry, your battery life is going to be good while using the app.
So tap OK.

Your phone is going to take you to a new interface with a list of apps, please follow the steps below.
Step 1: While you’re on the battery optimization screen, tap the arrow pointing down.

Step 2: Tap All Apps.

Step 3: Scroll through the list of apps you have and tap NetGuard when you see it.

Step 4: Tap Don’t Optimize and tap Done.

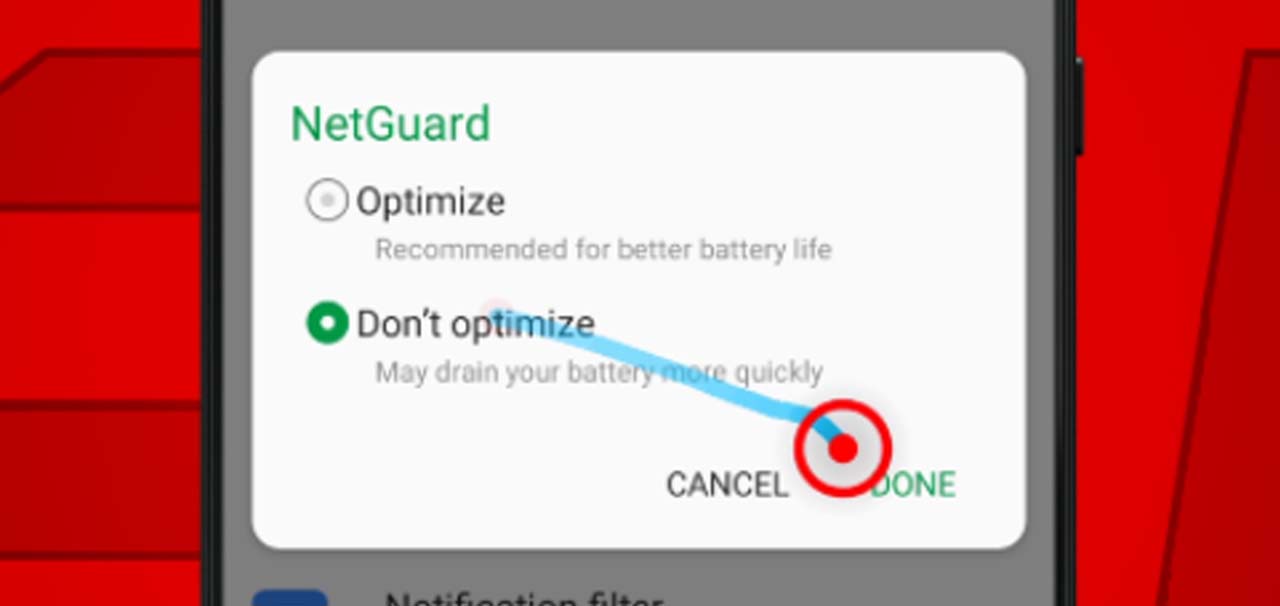
Now, you’ll see that NetGuard has a “Not optimized” status.

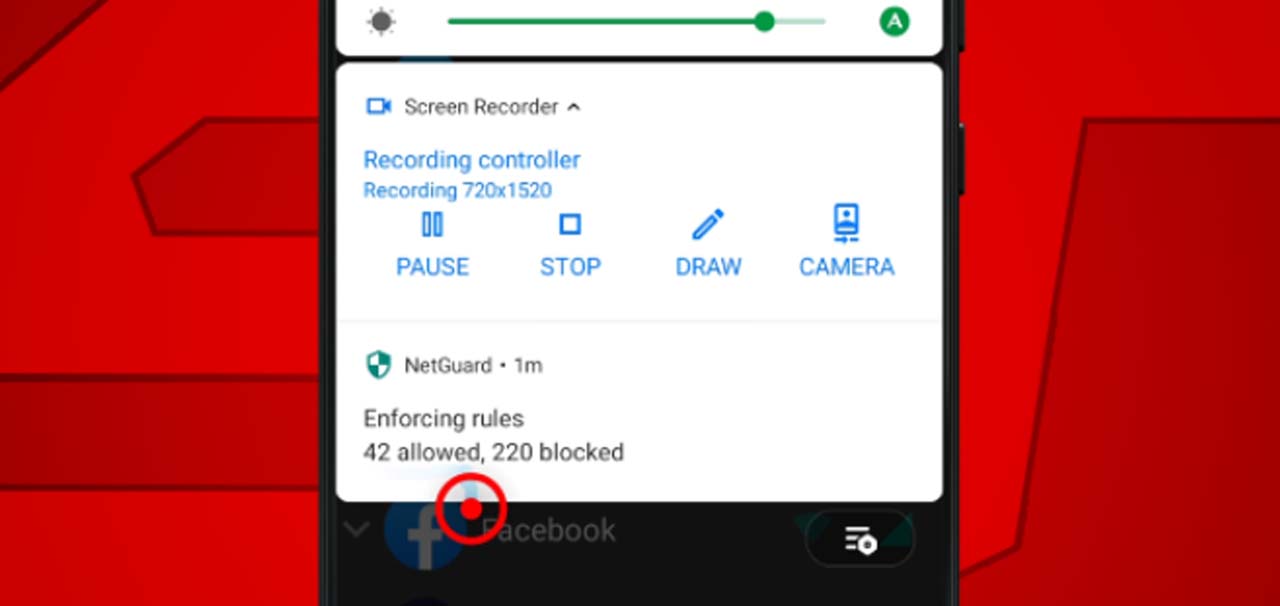
At this point NetGuard is already blocking all the apps you don’t want having internet access, you can see this by swiping your notification panel down.
You can see from the screenshot below that I’ve allowed 42 apps and blocked 220 apps. Yours may be different.
So that’s basically how you can use NetGuard for restricting internet access on your Android phone.
As promised, I have my exported settings, that’s for those of you who don’t want to have to go through the steps I’ve laid out.
So download it and follow the steps below to import it to your phone.
How to Import NetGuard Settings
Step 1: Tap the Menu Icon.
Step 2: Tap Settings.
Step 3: Tap Backup.

Step 4: Tap Import Settings.

Step 5: Navigate to where the exported settings file is and tap it.

Now wait a few seconds for the app to load.
Please note that you will have to turn on the activation switch again after importing any settings, because NetGuard automatically stops working after importing new settings.
Conclusion
Having control of what app has internet access on your phone is quite useful. You get to stop all those apps that do nothing but show ads without giving rewards like some games do.
This is also a way of managing your data if you’re on a limited plan.
Always ensure you connect to your WiFi network or Mobile data before you activate NetGuard, else it won’t work.
This is just one of the things you will have to understand as you use the app.
All questions regarding NetGuard can be asked in the comments, and I’ll answer as fast as I can.
Catch me on my YouTube channel to get early access to tutorials like this.


Hey, thanks for the detailed tutorial. I was wondering why certain apps were showing up in red text; your post helped clarify that.
I’m glad it did. Just poured out all I know about the app.
However, if you have more questions, please let me know.
Thanks for stopping by.
Great tutorial, thank you!
Is the local VPN set up by netguard works like other secure VPN. Is it encrypted or it doesn’t help at all from advertisers or hackers.
It’s not encrypted. I’ll try to look for a VPN that does what Netguard can do.
Very nice and informative. Thank you.
Hi Shaibu, thanks for this clear tutorial. I just started using NetGuard, because it was recommended to me, to prevent automatic app updates. But I wonder: I have an app that I do not want to update automatically, yet it is an app that must use WiFi to control a local device. If I give it WiFi permissions to control that device, wouldn’t it then also have access to the internet, and risk being updated? It is an older app, and very important to me that it not be updated.
Netguard isn’t going to stop apps from auto updating. You can stop auto updates from the play store. You don’t need netguard to do that.